Every driver must know exactly what the function of each button is and when to use it
First, you must know that every car is different from the other, and there are some features or buttons that are not available in all cars, and if they are available, they are the same symbols and the same buttons and graphics
In addition, there are privileges in modern cars that are not available in old cars, so we have to take all of that into account.
We start with the explanation
Vehicle characteristics
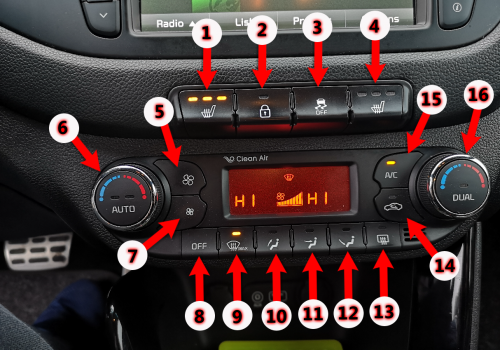
- Button No. 1 is used to heat the driver’s seat. You can choose the degree of heating through it with three presses
- Button No. 2 is the car’s central lock, and when pressed, all doors are closed for safety and it lights up in yellow
- Button No. 3 deactivates the car’s anti-lock system, and it is not recommended to activate it except for reasons related to the driver
- Button No. 4 is used to heat the second seat next to the driver, and its function is exactly the same as button No. 1
- Button No. 5 to strengthen the air conditioner air, whether hot or cold. You can press several times to strengthen
- Button number 6 to choose the air conditioning mode and the temperature or cold in the car by turning the button right and left
- Button No. 7 to reduce the air force is the same as button No. 5, but in reverse
- Button No. 8 To turn off the cooling/heating system, you can press button No. 8 once
- Button No. 9 activates the air flow to the windshield to remove internal foggy buildup or fog from the glass
- Button No. 10 directs the air from the bottom towards the top. You can turn it on or off with one press.
- Button No. 11 directs the air directly to the body of the front passengers and can be turned on or off with one press.
- Button No. 12 directs the air to the legs and warms them, and it can also be turned on or off with one press
- Button No. 13: It is a feature of removing fog accumulation on the rear window, and it is an effective tool for removing interior fog.
- Button No. 14 repeats the indoor air only without drawing air or passing outside air inside. I recommend it in the winter
- Button No. 15 to turn the air conditioner on to cold mode and turn on the car’s cooling system
- Button No. 16 allows the passenger next to the driver to control the temperature directed to him only
Characteristics of internal electrical energy
In some or most cars there are very useful sockets for charging mobile phones and devices or for connecting the phone to the car’s radio to listen to music and other things. This is a picture and shape of the available ports.
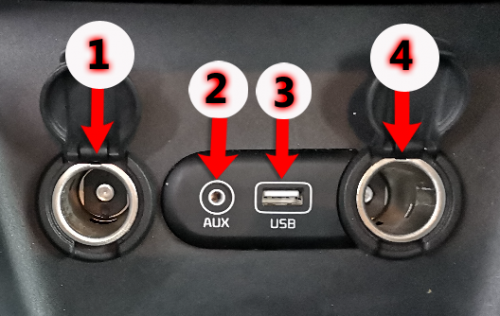
- Port No. 1 and 4 to place a traditional phone charger
- Port 2 is for connecting the phone through a wire called AUX
- Port No. 3 to connect the phone and charge it through it, and the power of electricity in it is like a phone charger
Sensor characteristics
Button to turn off or turn on the sensor sound
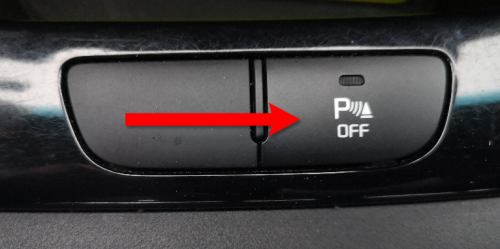
When you see this button in your car, it turns on or off the sound of the car’s rear sensors, and it is not recommended to disable it
The car’s sensors warn you of approaching obstacles, which is a very useful feature in cars
Characteristics of the right stick
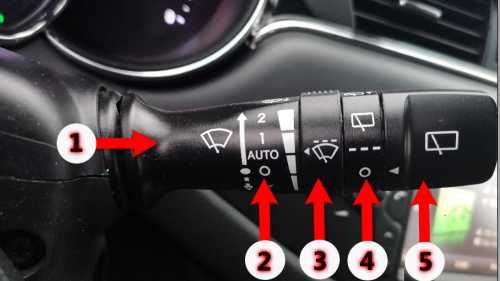
- Number 1 is the entire hand. Pulling it toward the steering wheel pumps water onto the windshield. Pulling it against the steering wheel pumps water onto the back window.
- Number 2 to control the wiper speed
- Number 3 to operate the front wipers
- Number 4 to operate the rear wipers
- Number 5: Move handle for selection
Left/lighting stick features
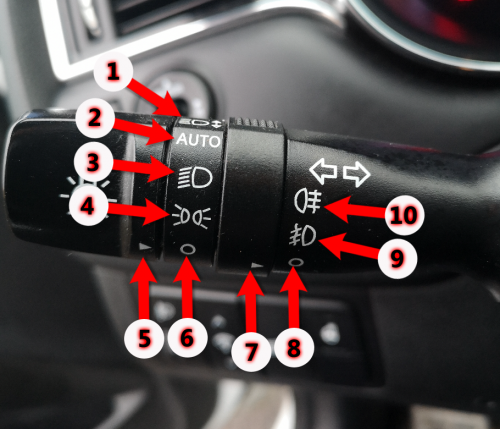
This stick is important and essential in the car, because through it you can control the car’s lights, such as the corner light, high beams, fog lights, and all front and rear lights. I will explain the function of each of the options on the stick, which are often uniform in all cars and have the same shape and symbols.
- Number 1: When you lower the stick down, the high beam is activated. It is preferable to use it in the dark if there are no cars or bikes opposite you, as the high beam causes severe dazzle for the driver opposite you.
- The number 2 is the automatic operation mode for the lights. This means that when darkness falls, the car’s lighting turns on automatically and turns off when it is not needed automatically.
- The number 3 is to turn on the corner light, which is the light that must be used unless the car has additional lights that operate without human intervention.
- Number 4 is the stop lights, which are the red rear lights of the car and must be turned on when you are standing next to the road
- Number 5: Move handle to select and activate the desired lighting
- Number 6: When the stirring handle is placed on the circle in number 6, the automatic and optional lighting is turned off.
- Number 7 is the moving handle for the front and rear fog lights, and you can move it up to choose which lights you want to turn on.
- Number 8 When the handle is placed on the circle marked with the number 8, the front and rear fog lights turn on
- The number 9 activates the front fog light and is used when there is heavy fog
- The number 10 turns on the rear fog light and is used when there is heavy fog
Shift stick
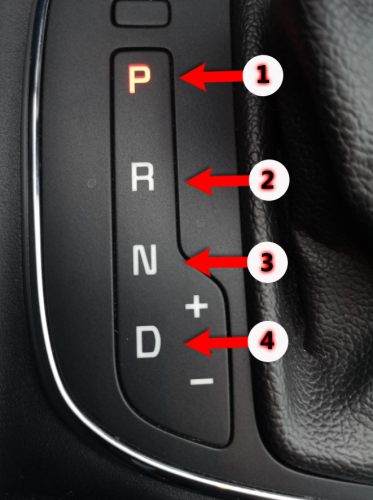
This is a picture of the letters next to the car’s transmission
- No. 1 Park standing position
- No. 2 Reverse position
- No. 3, unloaded position / no spare parts
- No. 4 to drive forward
Additional features in the car
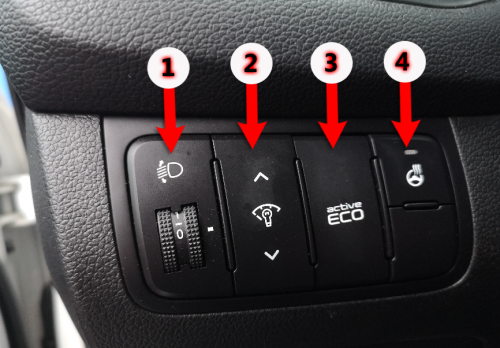
- Button No. 1 controls the height of the corner light, not exceeding a permissible limit
- Button No. 2 to control the intensity of the car dashboard lighting
- Button number 3 is the most important button, and if your car is equipped with the ECO system, this means that you are environmentally friendly, and the feature must be activated permanently, as it helps significantly reduce fuel consumption.
- Button No. 4 This is a nice feature, which heats the steering wheel in winter and extreme cold, and you can use it as needed
Left and right mirror control feature
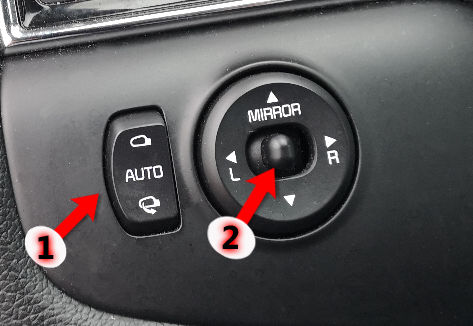
Button No. 1 to automatically open and close the mirror when the car is turned off and on
Button number 2 in the middle, you can turn it to the right to control the right side mirror or to the left to control the left side mirror, or you can leave it in the middle to control the height of the mirror up and down. You can control these things after directing the middle button to the desired mirror by pressing the small arrows at the right letter R or L. Left or up and down
Window buttons
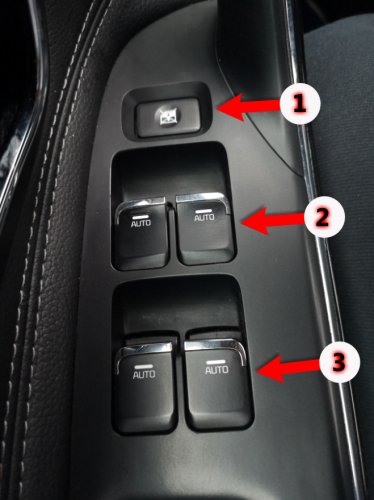
You will find these buttons in most cars unless the car has manual window control handles
Through these buttons, you can open or close the front and rear windows. There is also a separate button at each window next to the door opening handle to control the opening or closing of the window. This picture is for control from the driver, as the buttons
- Button No. 1 locks the control of all windows, front and rear, by passengers or children, and the control is only for the driver
- Buttons at number 2 to open or close the front windows
- Buttons at number 3 to open or close the rear windows
Additional features of the car

- Panel No. 1 gives you details of the weather condition and details of the doors if they are open, in addition to the clock and alerts for the seat belts.
- Button No. 2 is to turn on the four-way warning light. It is used in emergency situations only and turns on all of the car’s exterior lights
- Port No. 3: If your car has a screen and GPS, this port is for the memory card for maps
- Number 4 and the red square bar is for the car’s radio and screen and includes many features such as GPS, camera, etc. Not all cars are equipped with this screen.
The center mirror inside the car
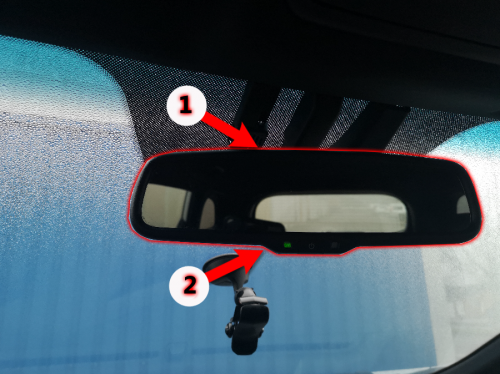
You may find it to be just an ordinary mirror, but in reality it is not so, as it contains an important feature, which is reducing the intensity of the driver’s dazzle. This means that if there is a driver walking behind you and using high beams, this will cause you severe inconvenience, and you can reduce its effects or remove it by activating this feature. In the center mirror until the light becomes green, like the picture at indicator No. 2, and it is preferable for it to remain active permanently. There was also a question about this in the theoretical exam, and the answer is that it reduces the intensity of the driver’s fascination with the light.
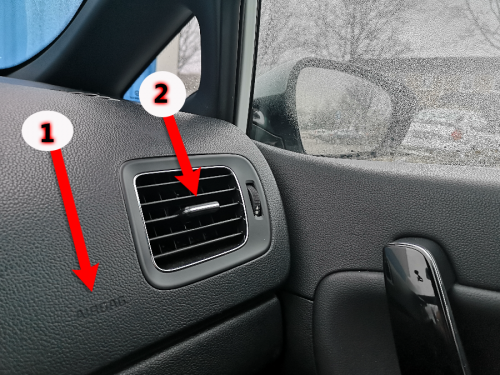
- Number 1 shows the location of the AirBag
- No. 2 is the nozzle for the air coming out of the air conditioning system
Air balloon
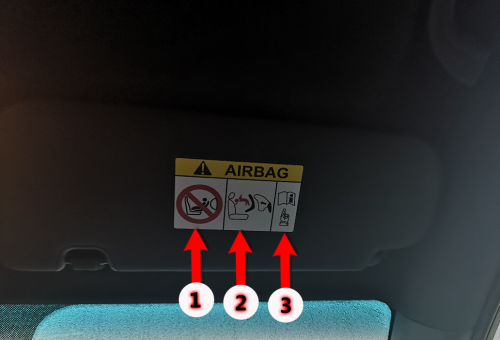
See the picture above. In most cars, you will find a warning against placing children and infants in the front seat in order to protect them, as the air balloon can cause them serious damage that may lead to death as a result of the intensity and force of the balloon’s thrust when it is opened due to an accident or collision.
- No. 1 sign prohibiting infants from being placed in the front seat if the balloon is active
- Number 2 explains what happens to the infant if the air balloon opens
- No. 3 asks you to read the instruction booklet
To disable the air balloon, you will find on the side of the car from the inside, and when you open the door, you place your car key in it and turn it to activate or deactivate the AirBag air balloon. This picture shows its shape and the way to activate or deactivate it.
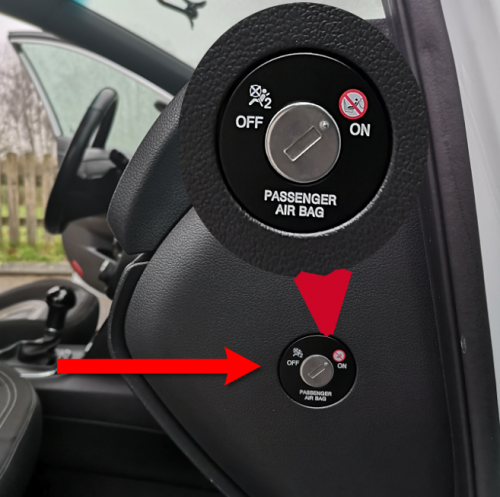
Here you put the car key and turn it, and there is also a diagram on this port
- When you turn the key to On, this means that the air balloon is activated
- When you turn the key to Off, this means that the balloon is disabled
Also, when the air balloon is deactivated, there will be a notification on the car dashboard warning that the balloon is off
Open the hood
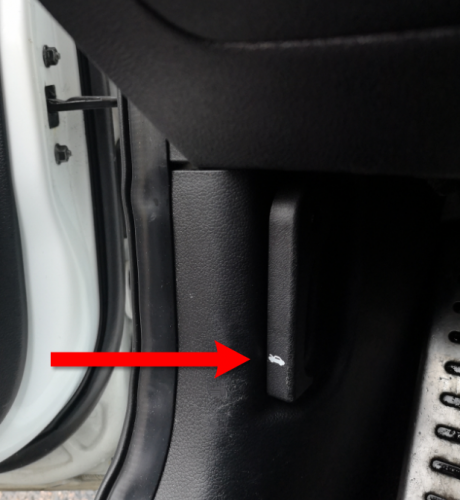
You will find under the steering wheel on the left side of the door that there is a handle with a drawing on it like the picture above. Through this handle you can open the hood by pulling it forward.